Guide
Researchvideo is a secure storing and transcription service for research related video and audio recordings in University of Jyväskylä. You can upload audio files and videos recorded with different tools directly to Researchvideo.
The service works in conjunction with MyJYU AI Transcription. It enables secure recording (e.g. interviews) on a mobile device and transfer of audio files to Researchvideo for transcription and storage.
Researchvideo and MyJYU AI Transcription are available to research and teaching staff (including doctoral researchers) as well as students (including students at the JYU Open University) for research and thesis work, not for other recordings.
Notice:
Although Researchvideo enables creation of automated transcriptions using Whisper AI language model, the transcriptions' quality should always be checked afterwards.
If you run into problems when using the service, please contact Researchvideo support via HelpJYU.
Introduction video
In English
In Finnish:
Who can use Researchvideo?
Researchvideo is dedicated to research purposes for research groups, staff members and students doing research (like thesis).
A. Get a new research project and permissions to it
Everything in Researchvideo is controlled by detailed permission and workflow models. All content is by default private to only project members and admins. No project content can be published to be viewed without logging in.
Apply for a new Researchvideo project by filling in a Vasara form
Link to the project order form.
Note: You can switch the form's language from the top right corner where FI is for Finnish and EN for English.
Log in for the first time
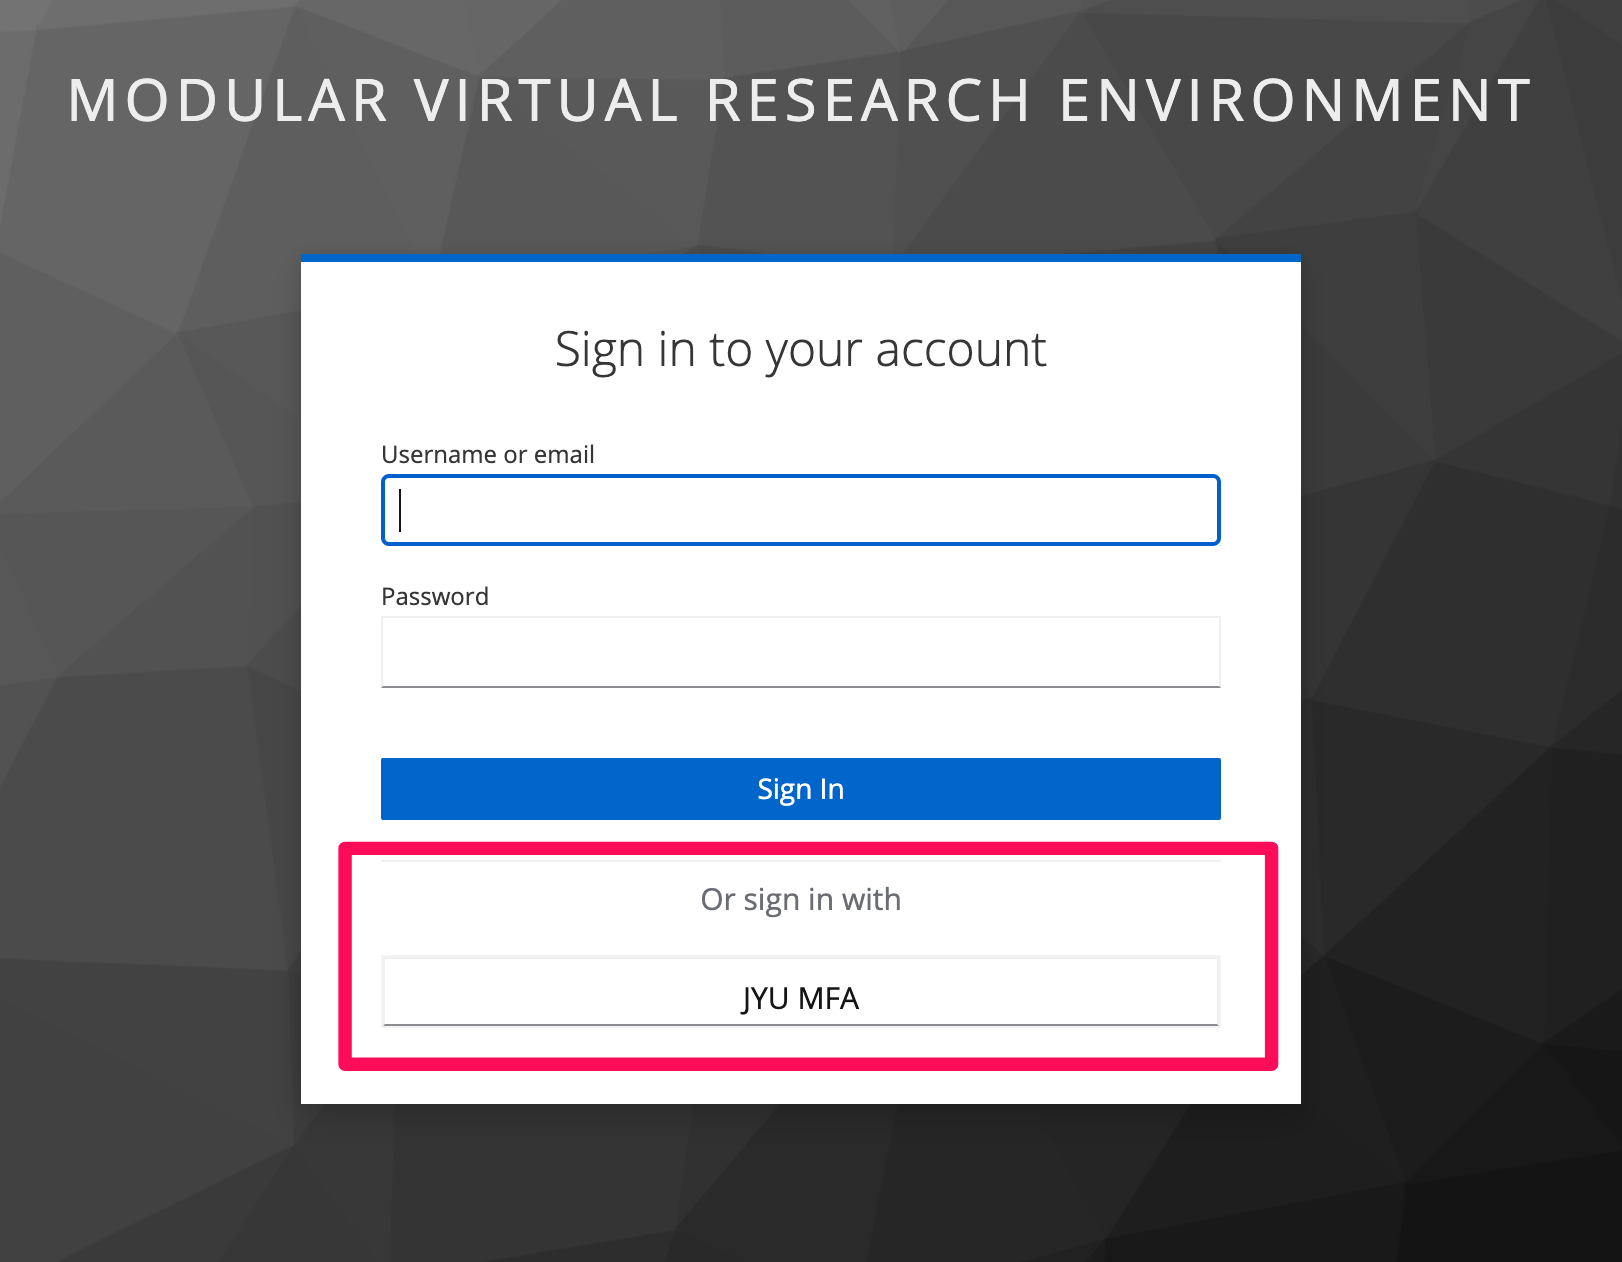
When you start using Researchvideo for the first time, log into the service via the log in button in the top right corner of the page. Initial login is required for permission sharing.
Log in is currently possible with JYU credentials. Multi-Factor Authentication is required using DUO Mobile.
Select JYU MFA login option.
With the first login session, please read data privacy info and grant access privileges.
Adding a new member to an already existing project:
1. If they have not done it yet, as the person to log into the service once (see the section above about logging in)
2. If the person does not need limited access rights to the project, the project manager can give them access via Vasara
3. Otherwise, please complete the HelpJYU form and include the following information:
- The name and email of the project member
- The project the person need access to
- The timeframe for the project access
- The types of permissions the member needs (editing/viewing)
Adding members in Vasara
If a person needs full project access and has active JYU credentials, the Researchvideo project manager can grant them project access by doing the following:
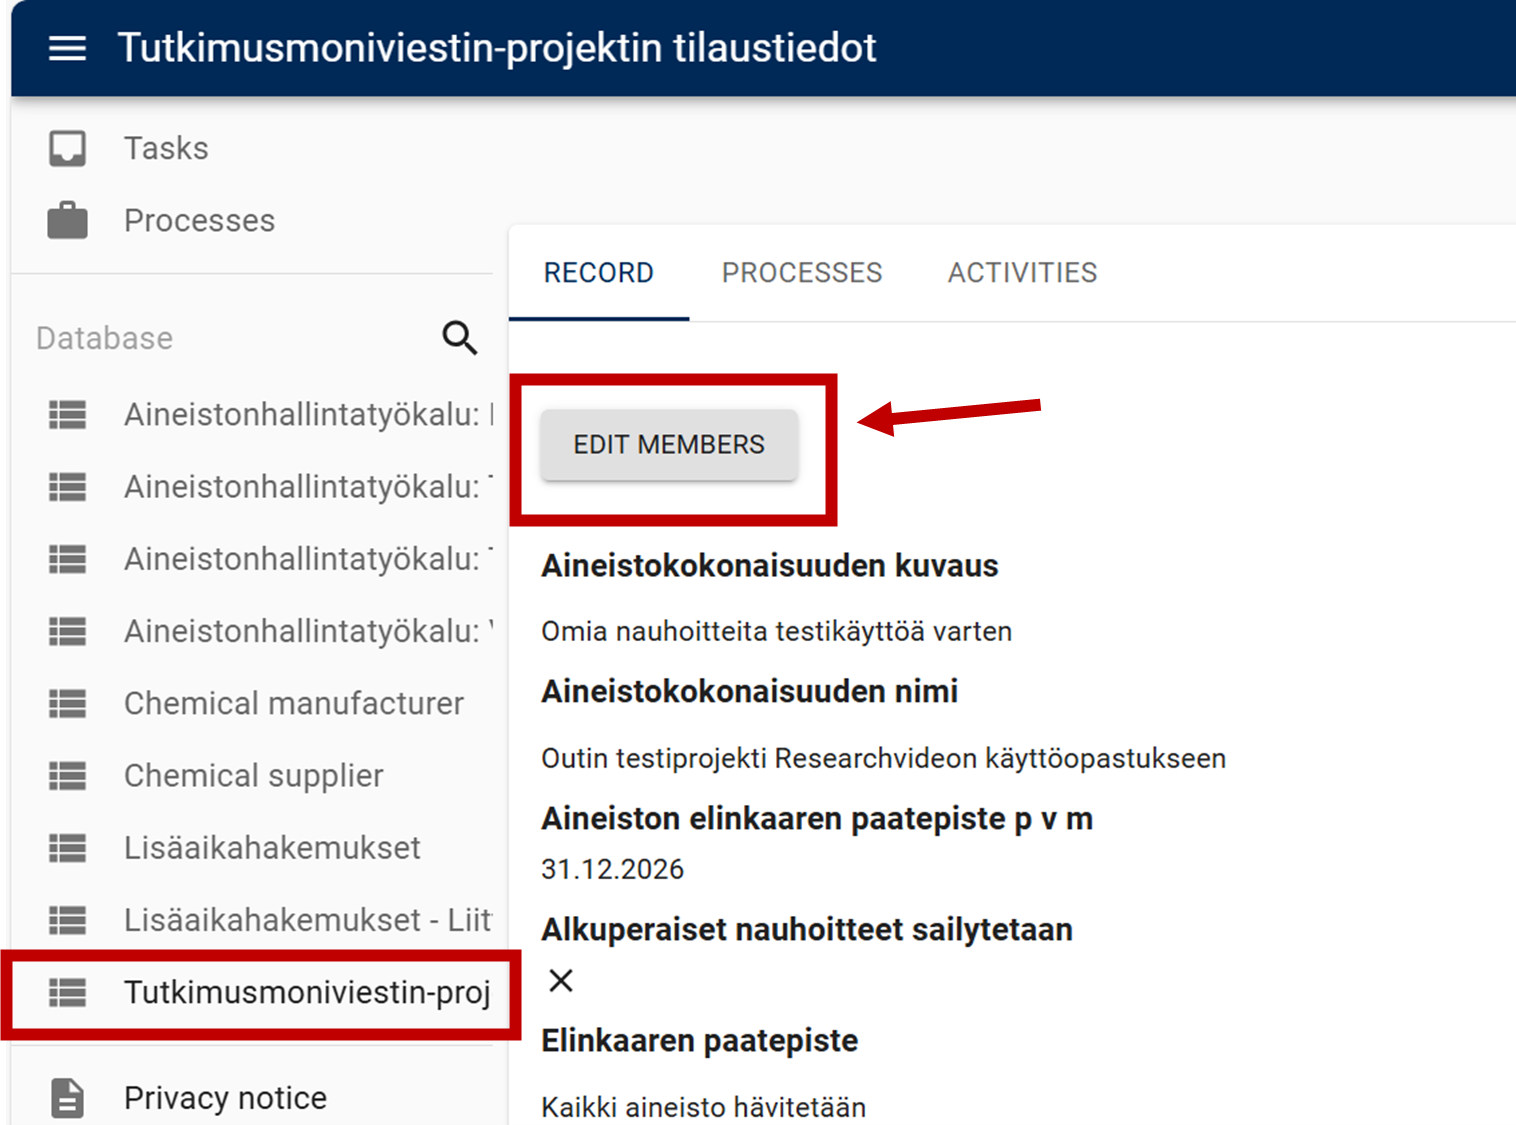
1. Log in to Vasara at https://vasara.app.jyu.fi/
2. Click Tutkimusmoniviestin-projektin tilaustiedot under the leftside menu Database and select the name of the given project.
3. Click the button EDIT MEMBERS (see the screenshot below).
4. Add a new member and fill in their information in format [JYU username]@jyu.fi or [JYU username]@student.jyu.fi (Note: basic project member is not marked as project's 'owner').
5. Click the button SUBMIT FORWARD.
1.-3. EDIT MEMBERS view in Vasara
B. Add new media pages for video and audio to your project
After getting access to your new research project, you may add new media pages. Please note that when uploading files, do not use a VPN connection, as it slows down the upload.
Media page is a container for one video or audio file and if necessary, text, images, and files. Think of it as a single, editable webpage around a video.
Example video of uploading a video and editing media page in Researchvideo (in Finnish).
All your active projects are listed on the My Projects page. You can navigate to it via the top horizontal navigation menu.

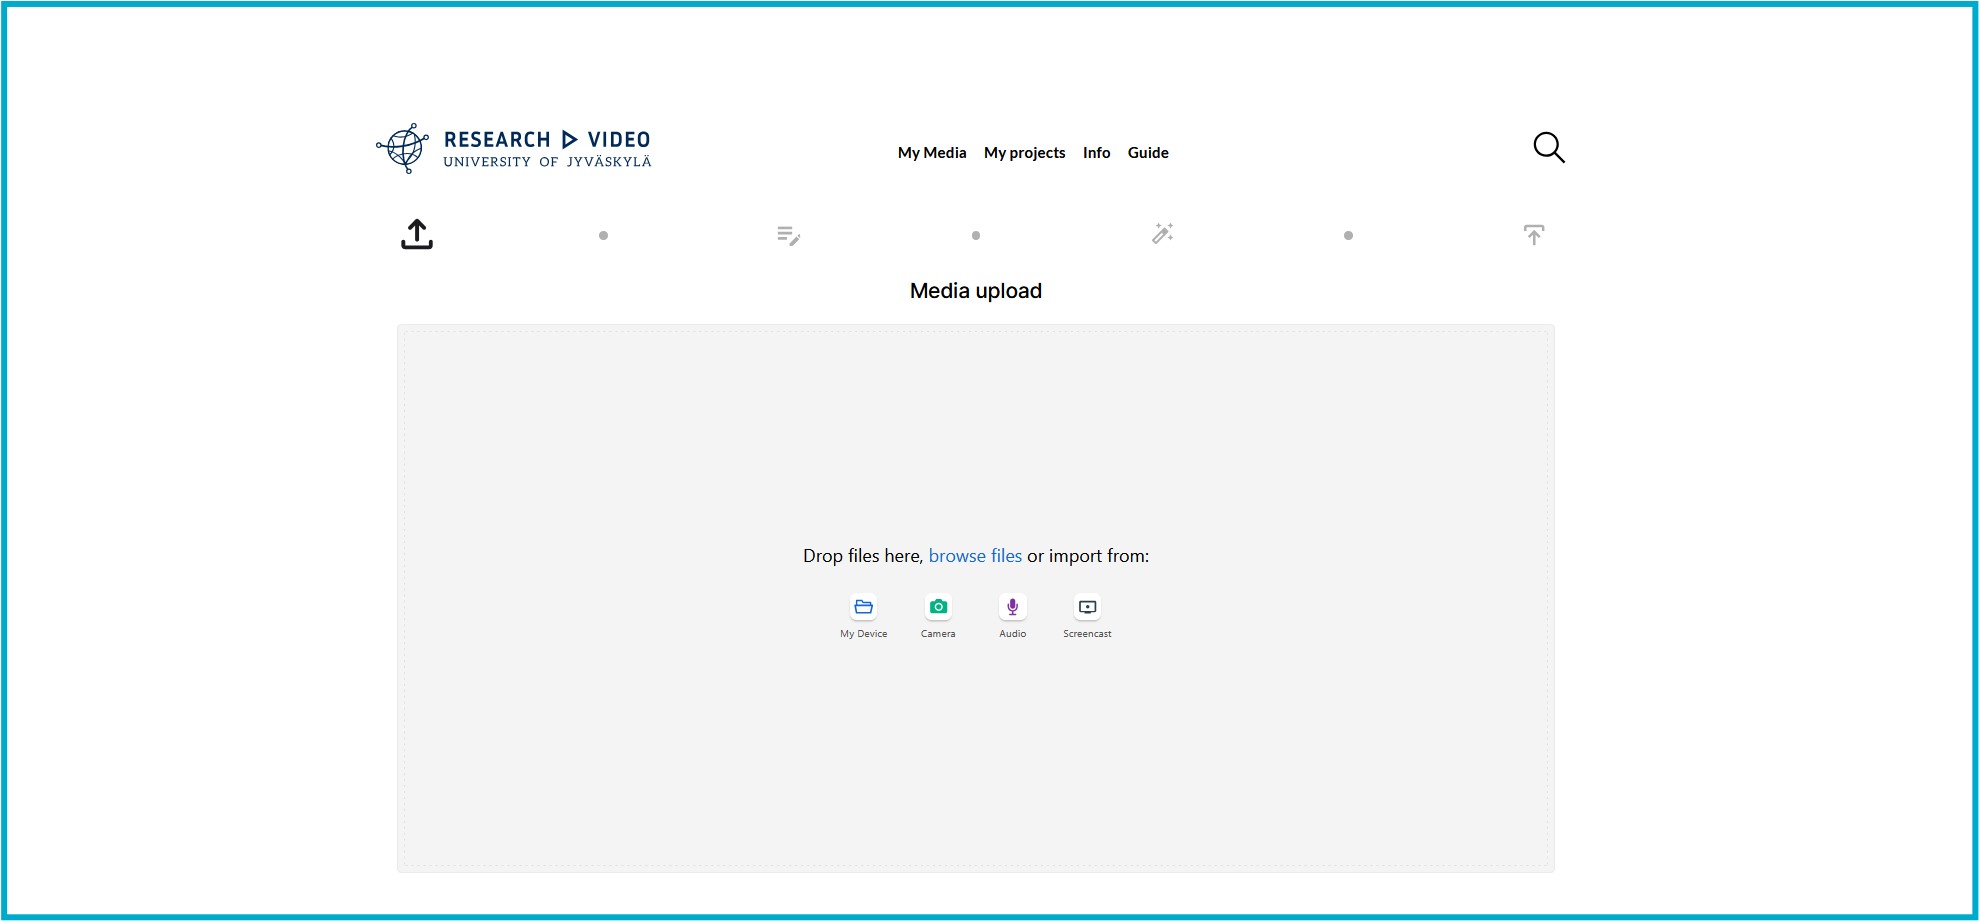
Upload a media file
Notice! VPN connection is NOT required to upload videos! Additionally you may want to disable active VPN to ensure maximum upload capacity.
- Go to your project space.
- Click the Upload video or audio button.
- Drop, browse or import the file you want to upload (see the screenshot below).
- Wait for the upload to process.
Add details and metadata
- Fill in the Title and Description to your video or audio file.
- Wait for the upload to finish.
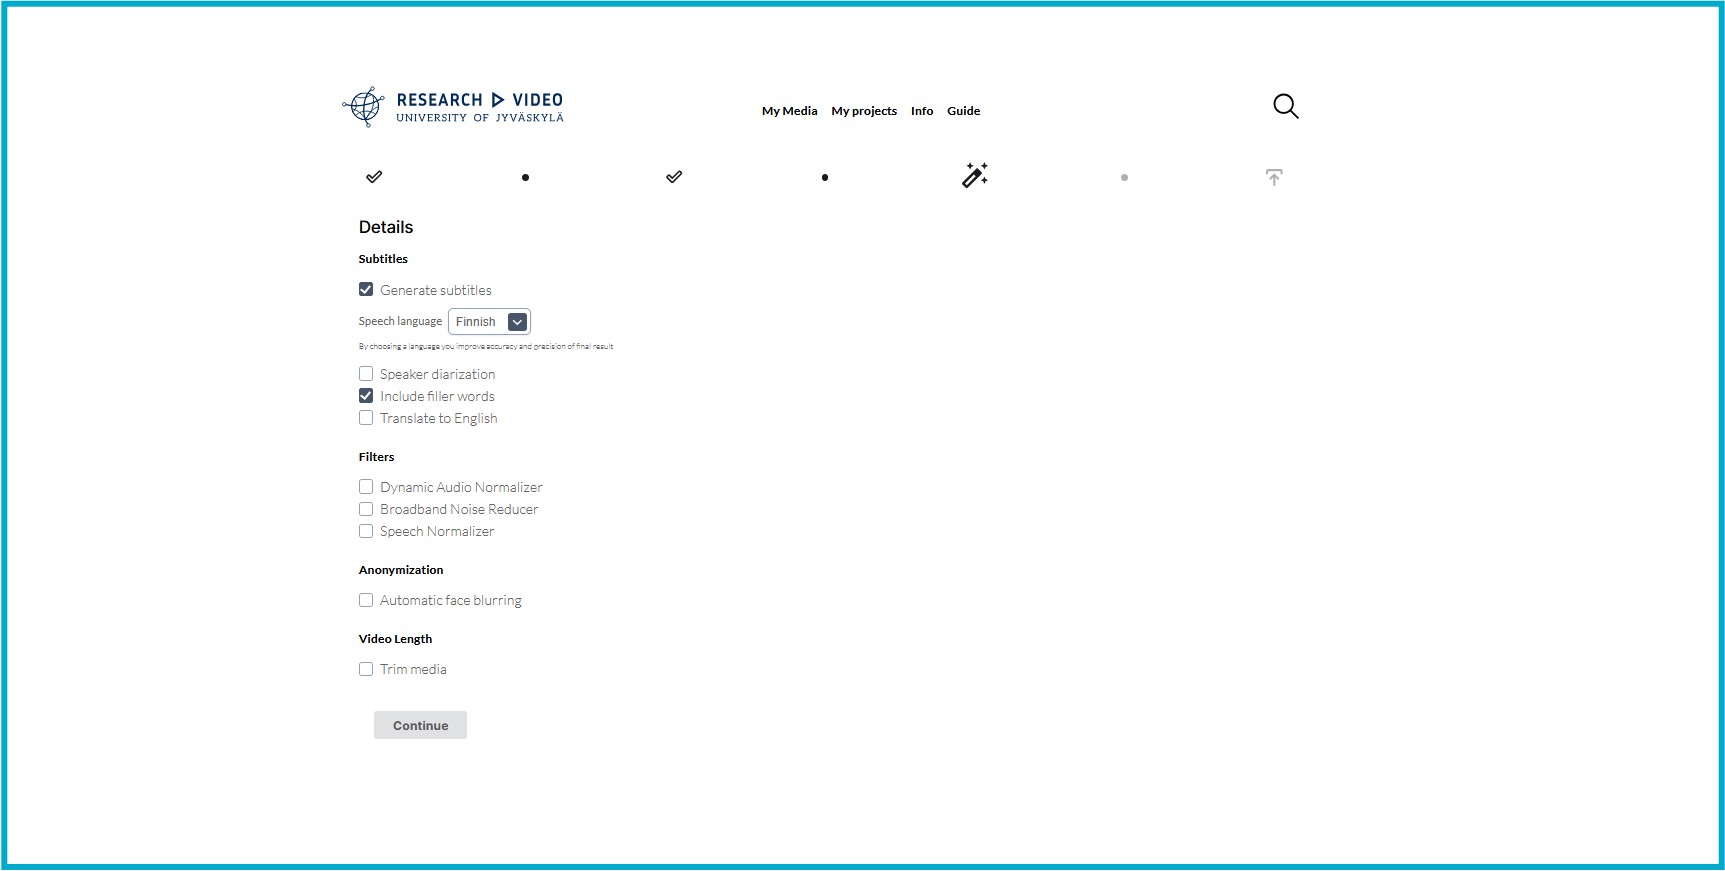
- Select needed additional processing like anonymization (automatic blurring of identifiable facial image of an individual person), subtitle generation, or trimming of the media file (see image below). Note: due to ongoing development, this section can have more options than the ones displayed below.
- The encoding process will begin and the progress will be visible.
Audio Filters options explained:
- Normalizer = turns up the volume of each media clip so that different videos sound roughly the same. Same gain setting is applied through the whole video (for example gain up by +11 dB) and this function doesn't change the volume differences inside the media.
- Dynamic normalizer = turns up the volume of each media clip and also evens out volume differences (for example, if one person speaks loudly and the other speaker is quieter, this effect tries to raise the volume of the quieter speech to make it sound same as the loud-speaking person).
- Noise reducer = removes unwanted background noise from the media (for example the hum of the ventilation machine, traffic noise...)

Subtitle generation (automated transcribing) DURING file upload
If you select the option Subtitle generation when uploading a media file, the program produces an automated transcription of the audio track. After selecting Generate subtitles automatically, you can also choose the following:
- Speech language (also defines the language of the transcription)
- Speaker diarization (automatically identifying separate speakers)
- Translate to English
The speech language is selected from a drop down menu where the languages are listed in English.

Subtitle generation (automated transcribing) and translation AFTER file upload
You can also generate subtitles or translations after a media file has been fully uploaded to Researchvideo by doing the following:
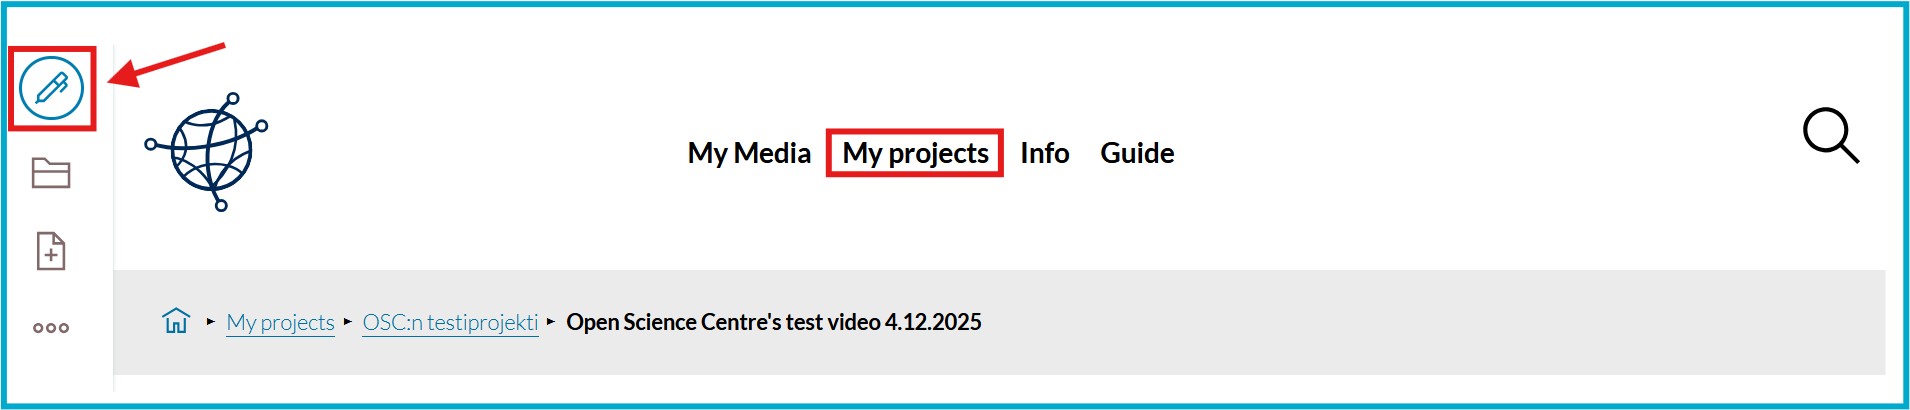
1) Navigate to your Researchvideo Project and select the media file's page you want to create subtitles/translation to.
2) After you have opened the media page, click the Edit icon in the left-side menu:
3) Click on the desired recording to open the subtitle editor in the streaming window:

4) Go to the right-side menu and select Block.
5) Scroll down to the subheading Subtitles:
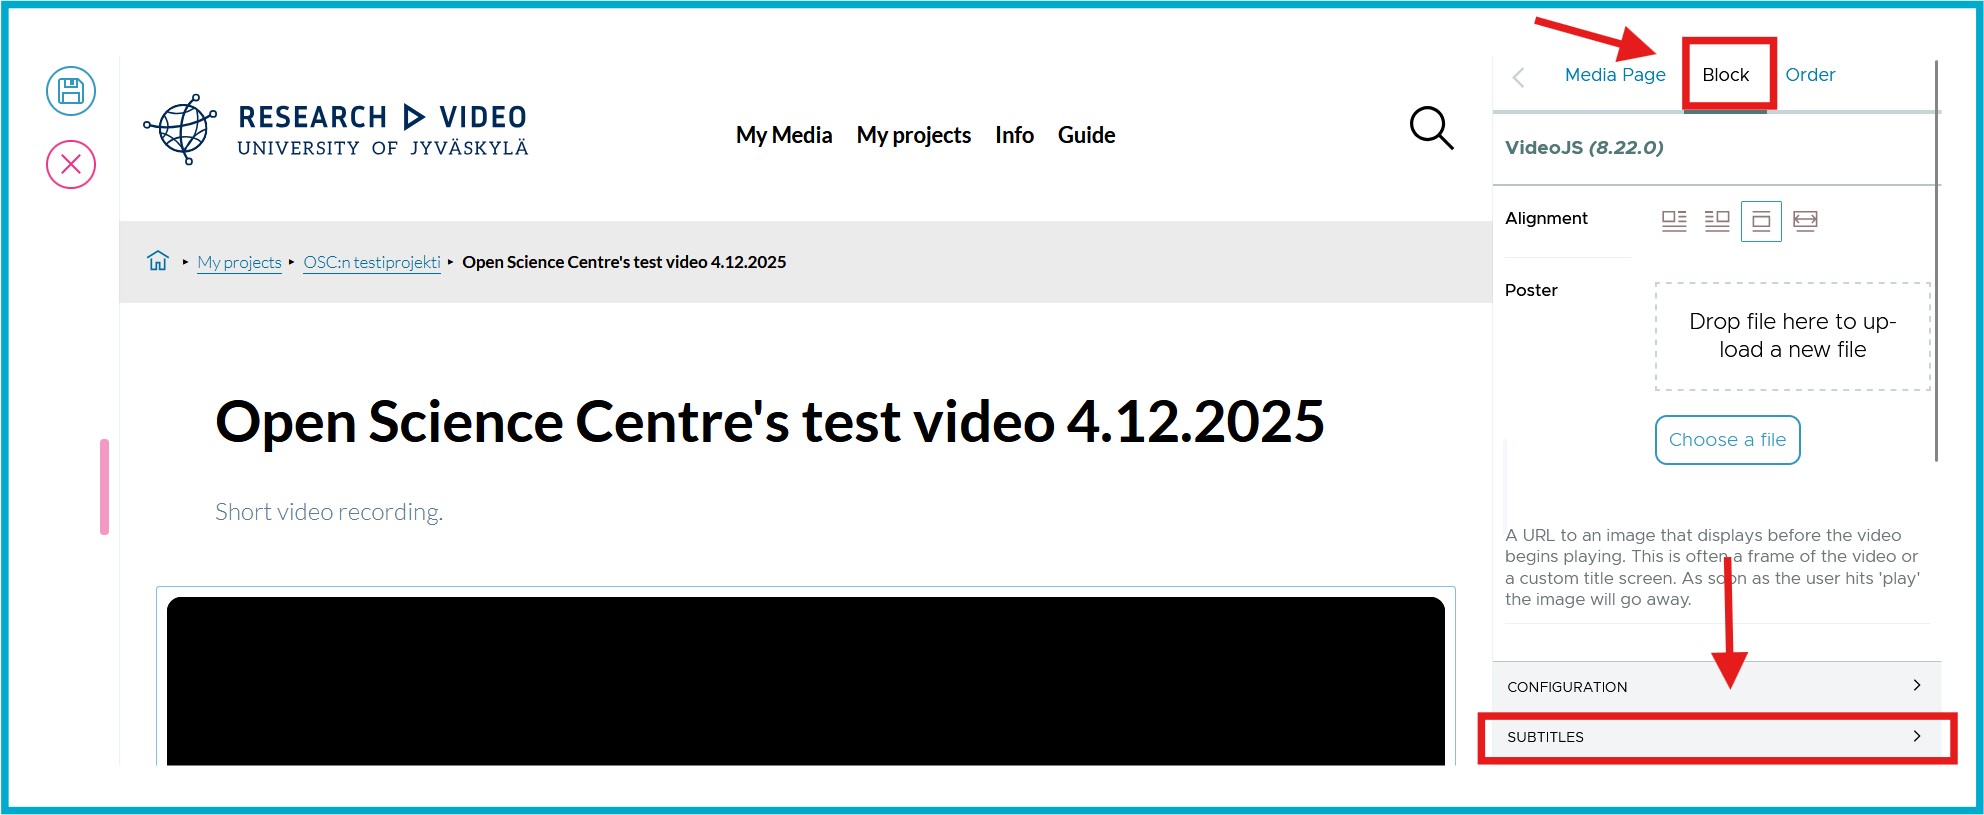
6) Select either Translate to English or Generate Subtitles. Wait few seconds for a progress bar to appear.
7) Save the page on the left.
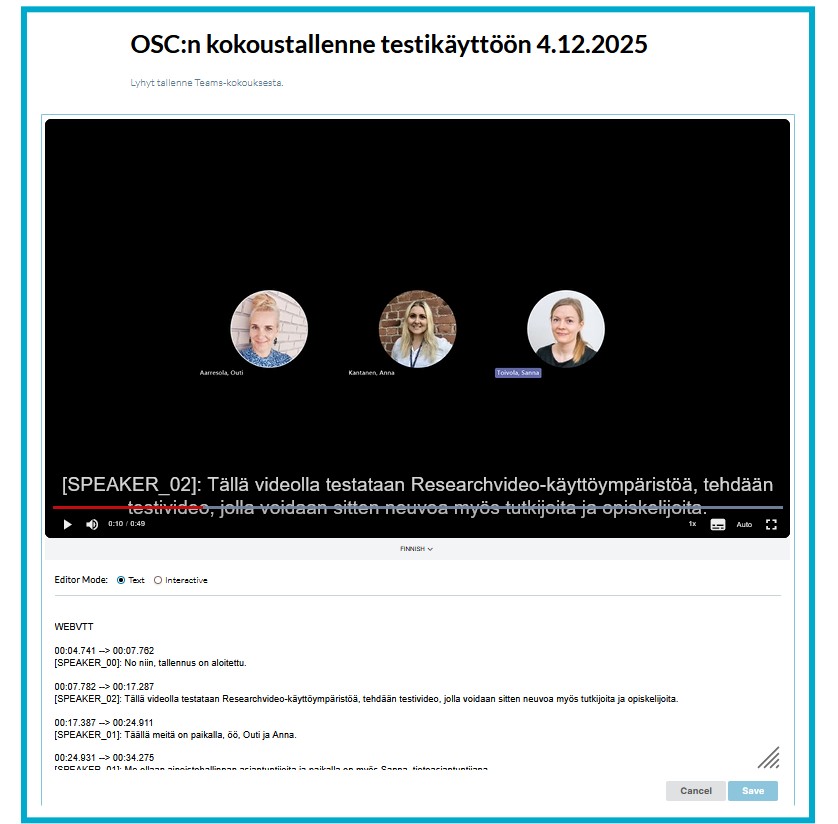
Once the transctiption is ready, the whole text can be edited in the editor below the recording. "Text" option is active by default and lets you edit and view the whole transctiption with one view:

Trimming a media file
You can trim the media file by selecting where the uploaded file starts and ends.
When you have selected the option Trim media, you can do the trimming by moving the yellow markers at both ends of the timeline bar.
NOTE: The media file resolution is lower at this point of the upload but the final upload will include a higher quality version of the file.

Visible progress
After encoding the draft version of the media you can already start editing the media page or view the video.
After all video qualities have been encoded, the page reloads automatically.
The media page is now editable.
C. Edit media pages
When you click the video and press enter you will get first block under it. Pressing enter multiple times creates many blocks.
On the Media Page section of the right-side menu you can also edit the video information and e.g. add categorization tags, and set an expiration date for the video. Note: Leave the publication date field empty.
Selecting a text in a block opens a text editor over it:
Blocks can contain text, images, and other elememts. You may select different blocks from the + button.
Read more about the blocks in Plone Documentation https://6.dev-docs.plone.org/volto/user-manual/blocks.html.
D. Edit subtitles
You can edit the subtitles by doing the following:
- Go to the media page of the given video or audio file and select the edit option from the left side menu (see part C. Edit media pages)
- Play a video
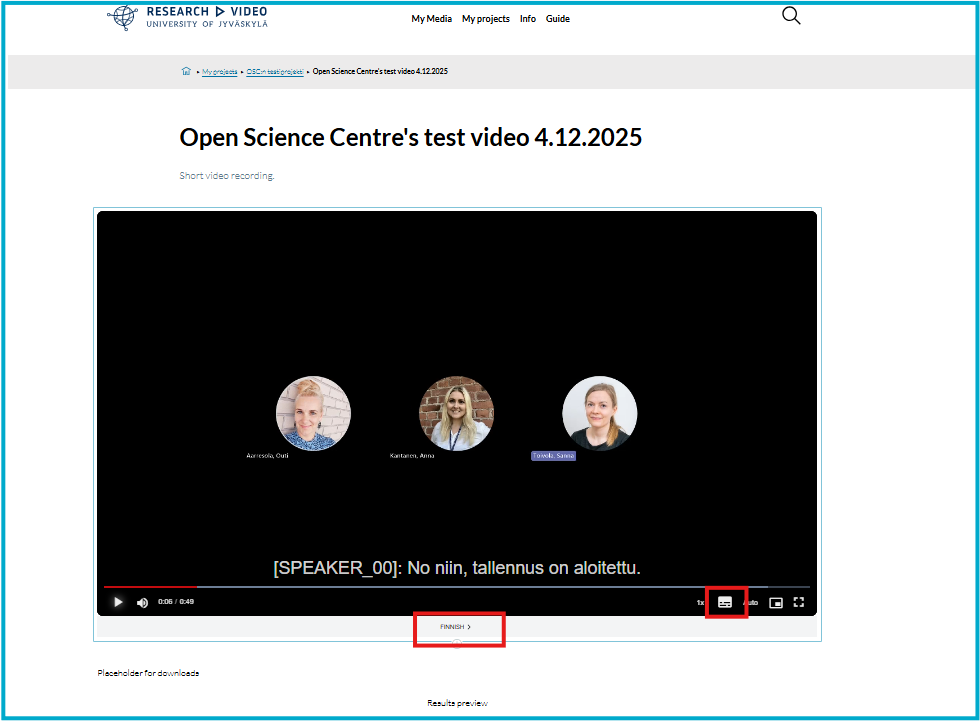
- Select a subtitle file from the subtitle menu (marked with red in the following picture)
- Add or edit subtitles using the editor below the video. The subtitles are displayed in timecoded blocks that enable you to quickly replay a specific clip. Note: if the editor does not show, click the language of the subtitle shown below the video (English in the example picture)
- Remember to save changes.
A single video may have multiple subtitles.
Rename subtitle files
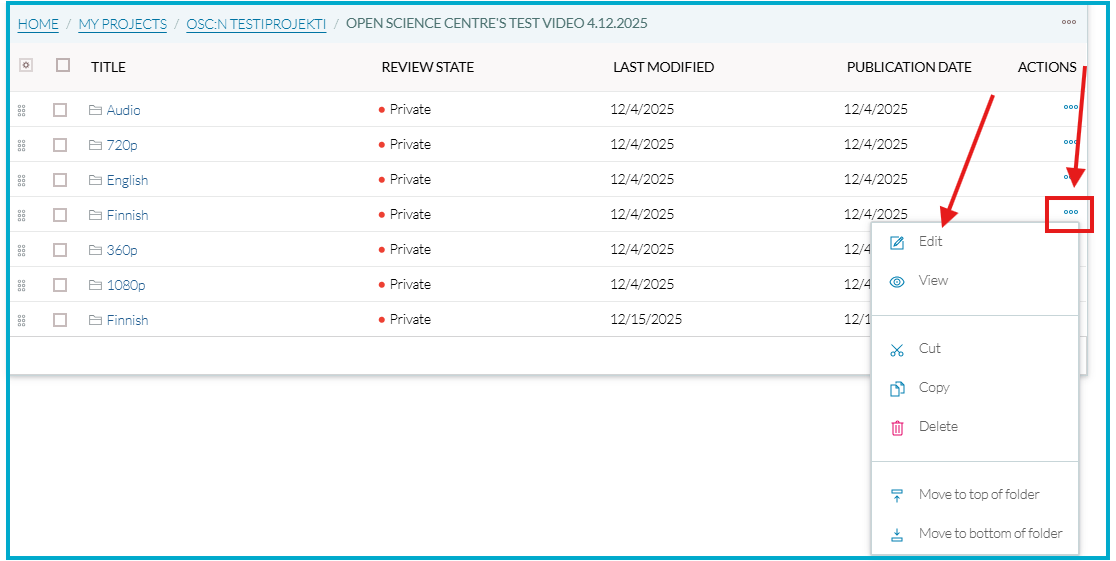
Navigate to the Contents page.
You can find a selection menu by clicking the "..." symbol. Click Edit.
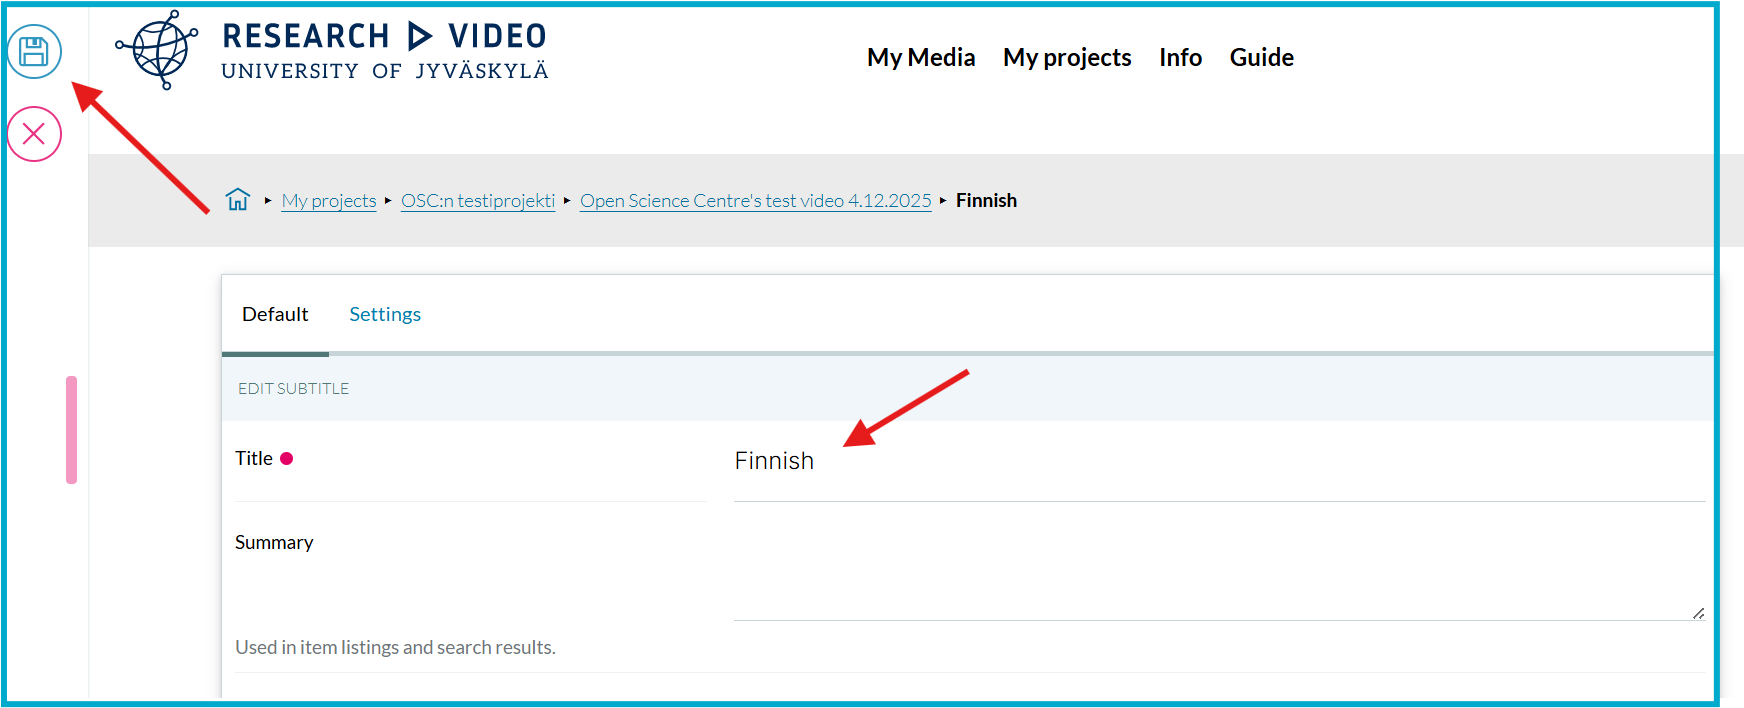
You can rename the subtitle file by changing the text in the Title field and saving the changes from the left side menu
E. Add other files
You can also upload and store text files, images and other types of files in your Researchvideo work space. These files can only be stored, not edited in Researchvideo. Editing the files requires exporting them on your computer.
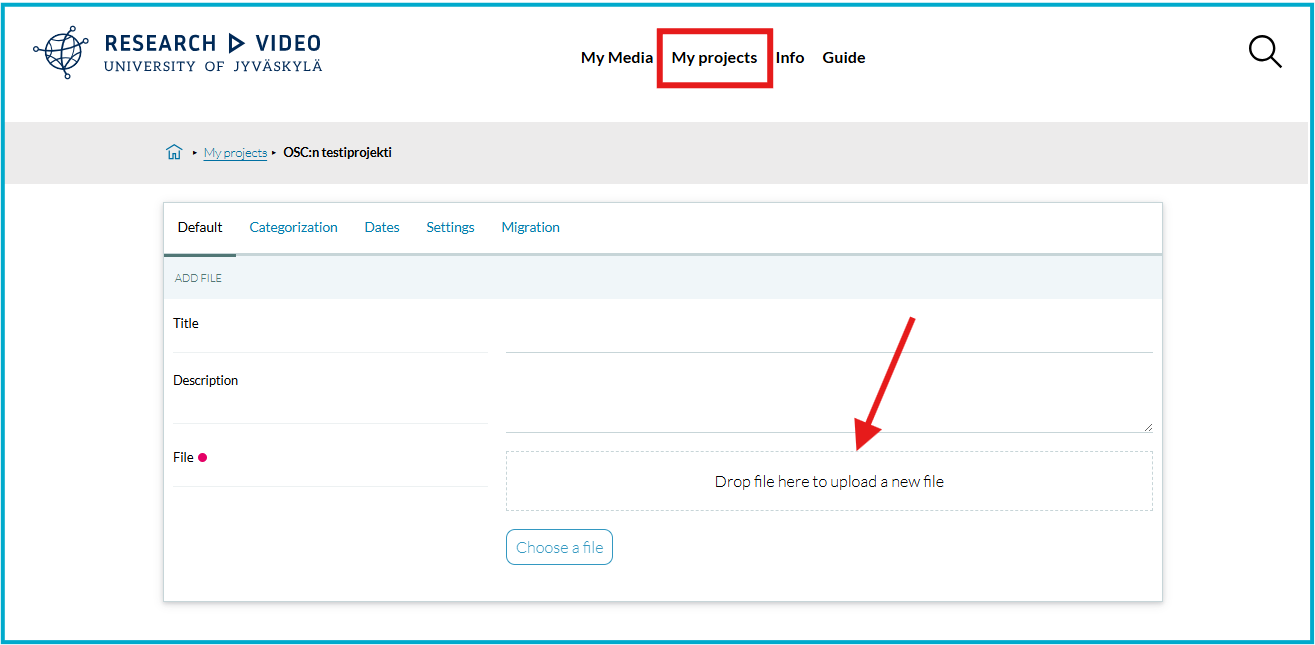
You can add files from the left side selection menu within your Researchvideo work space.
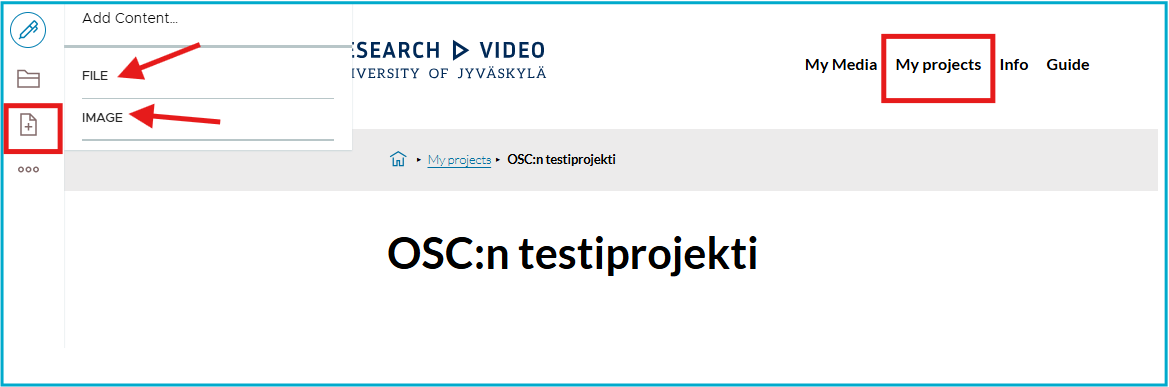
After choosing the type of file you want to upload, fill in its title and description and select the file to be uploaded. In the example picture, the uploaded file is an Atlas.ti project bundle.
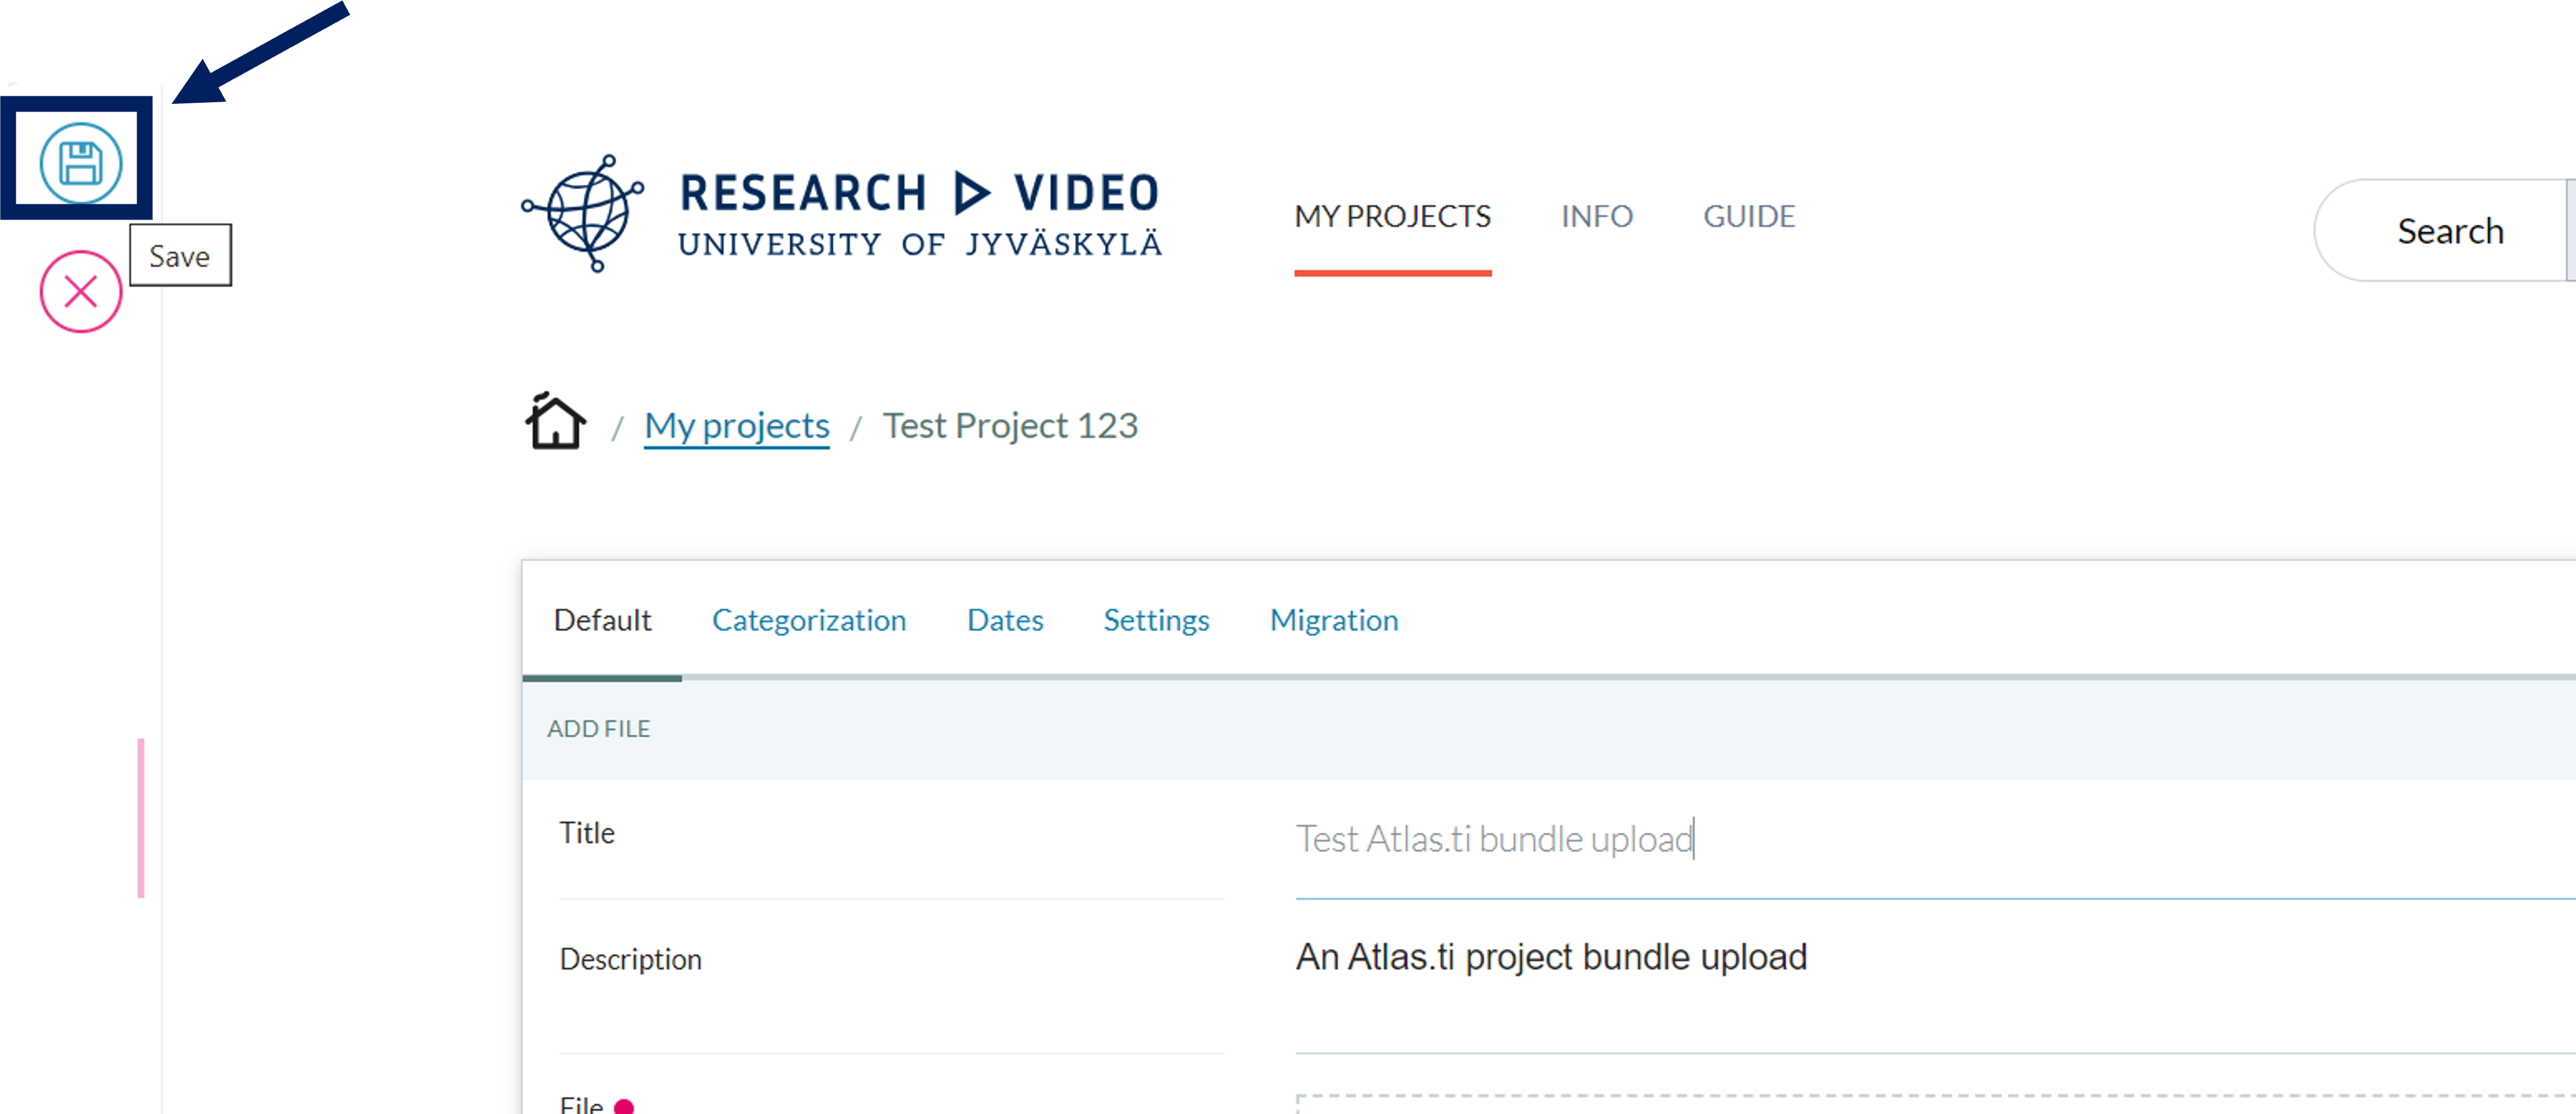
Tip: You can also add categorization to the uploaded file from the Categorization tab visible in the selection menu next to the heading Default. Categorization by tags enables you to better organize the way you view the Researchvideo project contents.
Save the file after uploading it and filling in its information
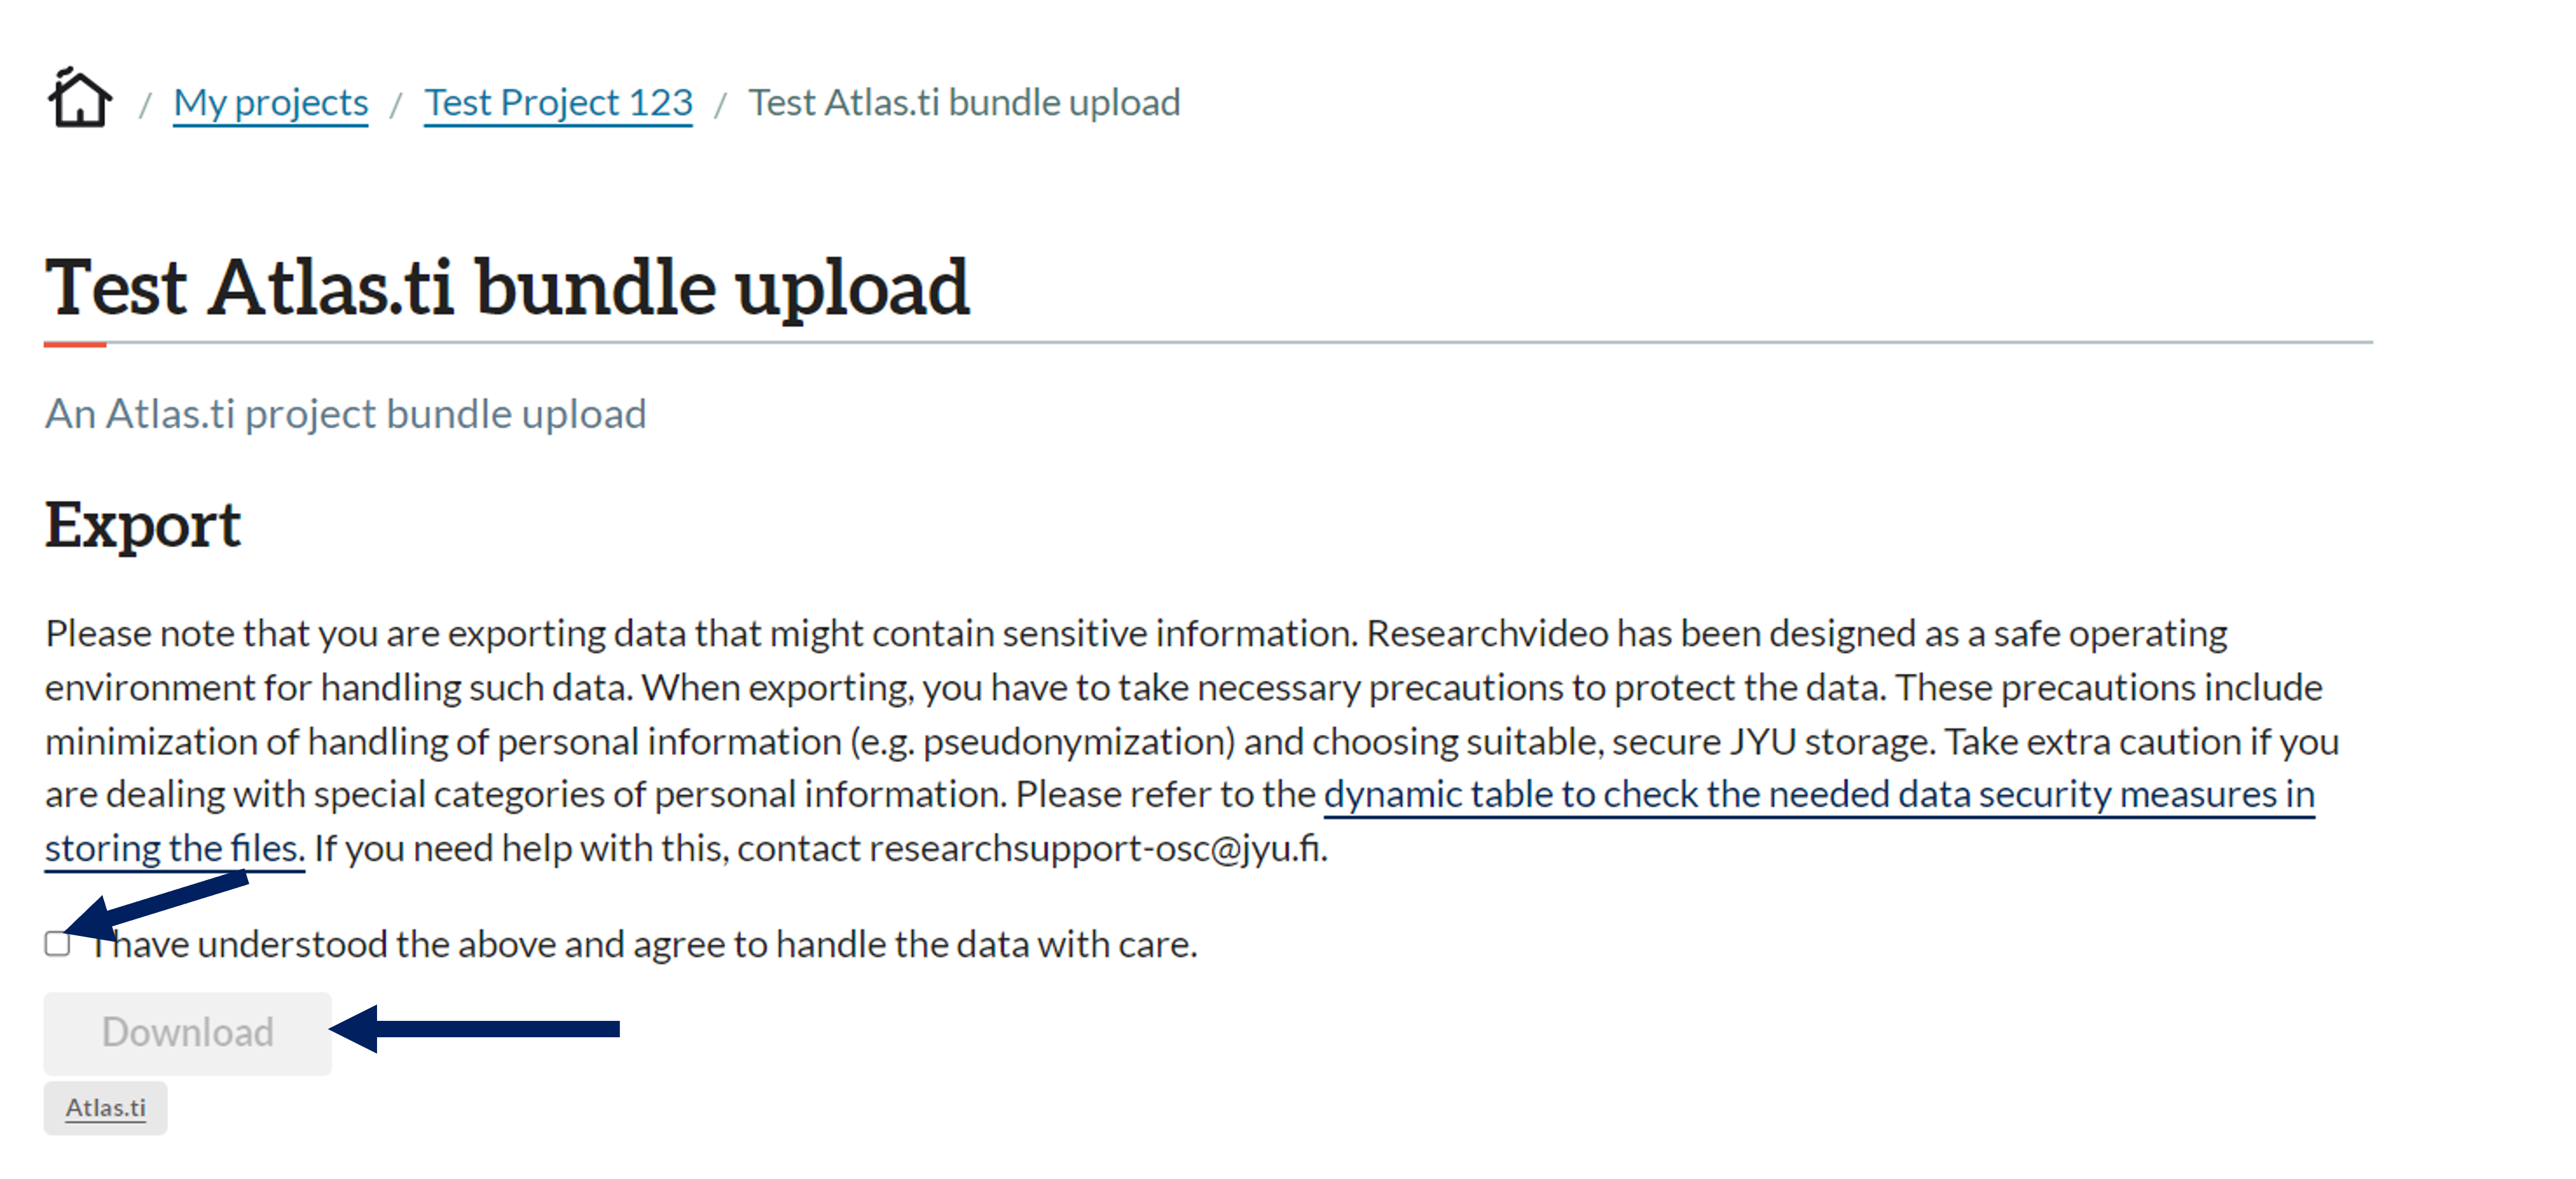
The file will now be listed alongside the other contects of your Researchvideo project. You can export the file by opening its media page, agreeing to the export conditions and pressing the Download button.
F. Move files from My Media -page to the project space
When you want to move files from My Media -page to the project space:
- Click “My Media” from the top navigation bar on the homepage.
- Open the media file you want to move (a single video or audio file) by clicking it from the list.
- Add /move to the end of the browser’s address bar and press Enter. Make sure there are no extra spaces or characters in the address bar.
- A window titled “Where do you want to move this item” will open.
- Select the correct project from the list and click the blue arrow at the bottom right.
- The file has now been successfully moved into the selected project.
G. Export full subtitles/transcriptions and media files
NOTE: Things to take into account when exporting transcriptions/subtitles/media files/other files
Please take care that the necessary precautions such as pseudonymization are done properly before this stage and that you select a suitable, secure JYU storage location for the transcriptions that contain direct and/or indirect personal information. You can use the dynamic help table for processing different types of confidential content (in Intranet Uno).
NB! If the transcriptions still need to contain sensitive personal information upon the export, make use of the dynamic table to check the needed data security measures in storing the files.
Before exporting/downloading files from Researchvideo, make sure that your browser settings direct the download to the intended secure storage location (e.g. JYU's NextCloud, network drive or locally on your JYU work computer). If you are downloading sensitive data, the location might need to be encrypted first, and the folder/vault needs to be opened before downloading files out of Researchvideo. Instuctions on how to encrypt folders by using Cryptomator.
Export feature
You can export video and audio files and transcriptions from the given media file's page. Press "Download" under the media file to export video or audio file.
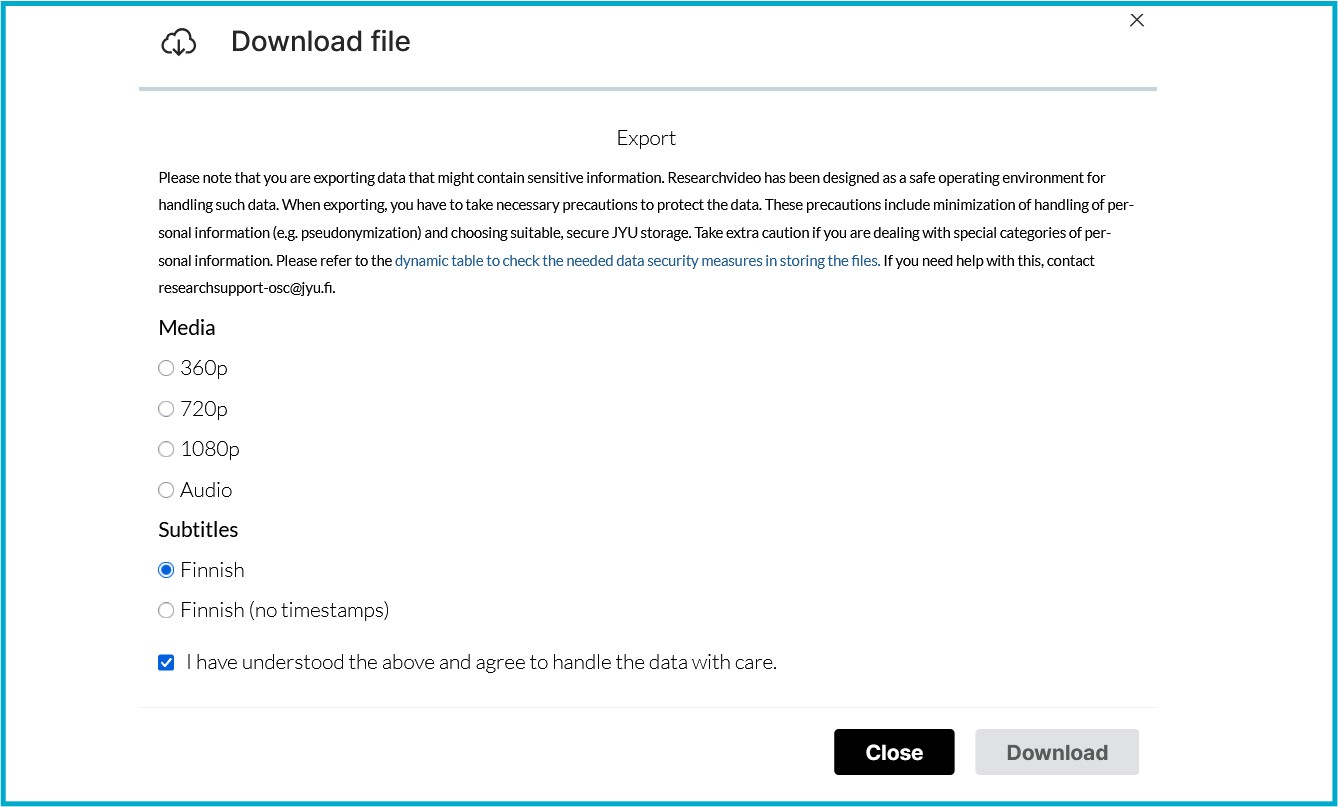
You can export one file at a time, which is why you can choose only one media file option or subtitle/transcription. Before exporting by pressing the Download button, you must agree to handle the exported data with care:
If you require assistance, please complete the HelpJYU form: Contact Researchvideo support
H. Logging out and editing profile information
You can log out of the service by navigating to the bottom left corner of the page. Logging out happens via the red log out symbol. From the selection menu you can also navigate to editing your profile details and preferences (mainly language preference).
I. Delete contents
If you need to remove media or subtitle files, you can do this by doing the following:
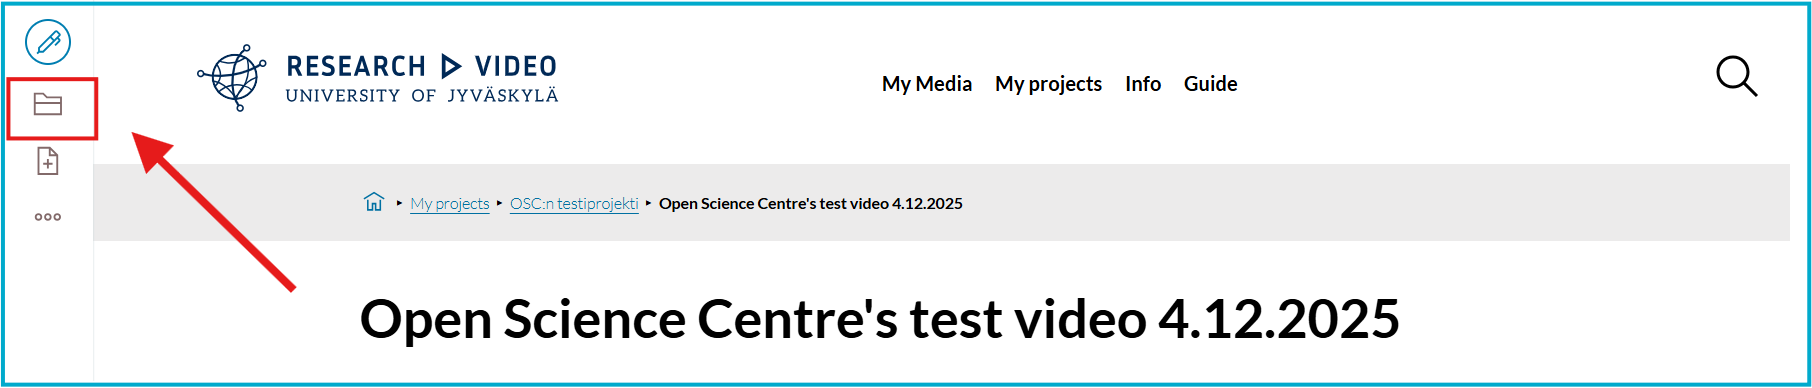
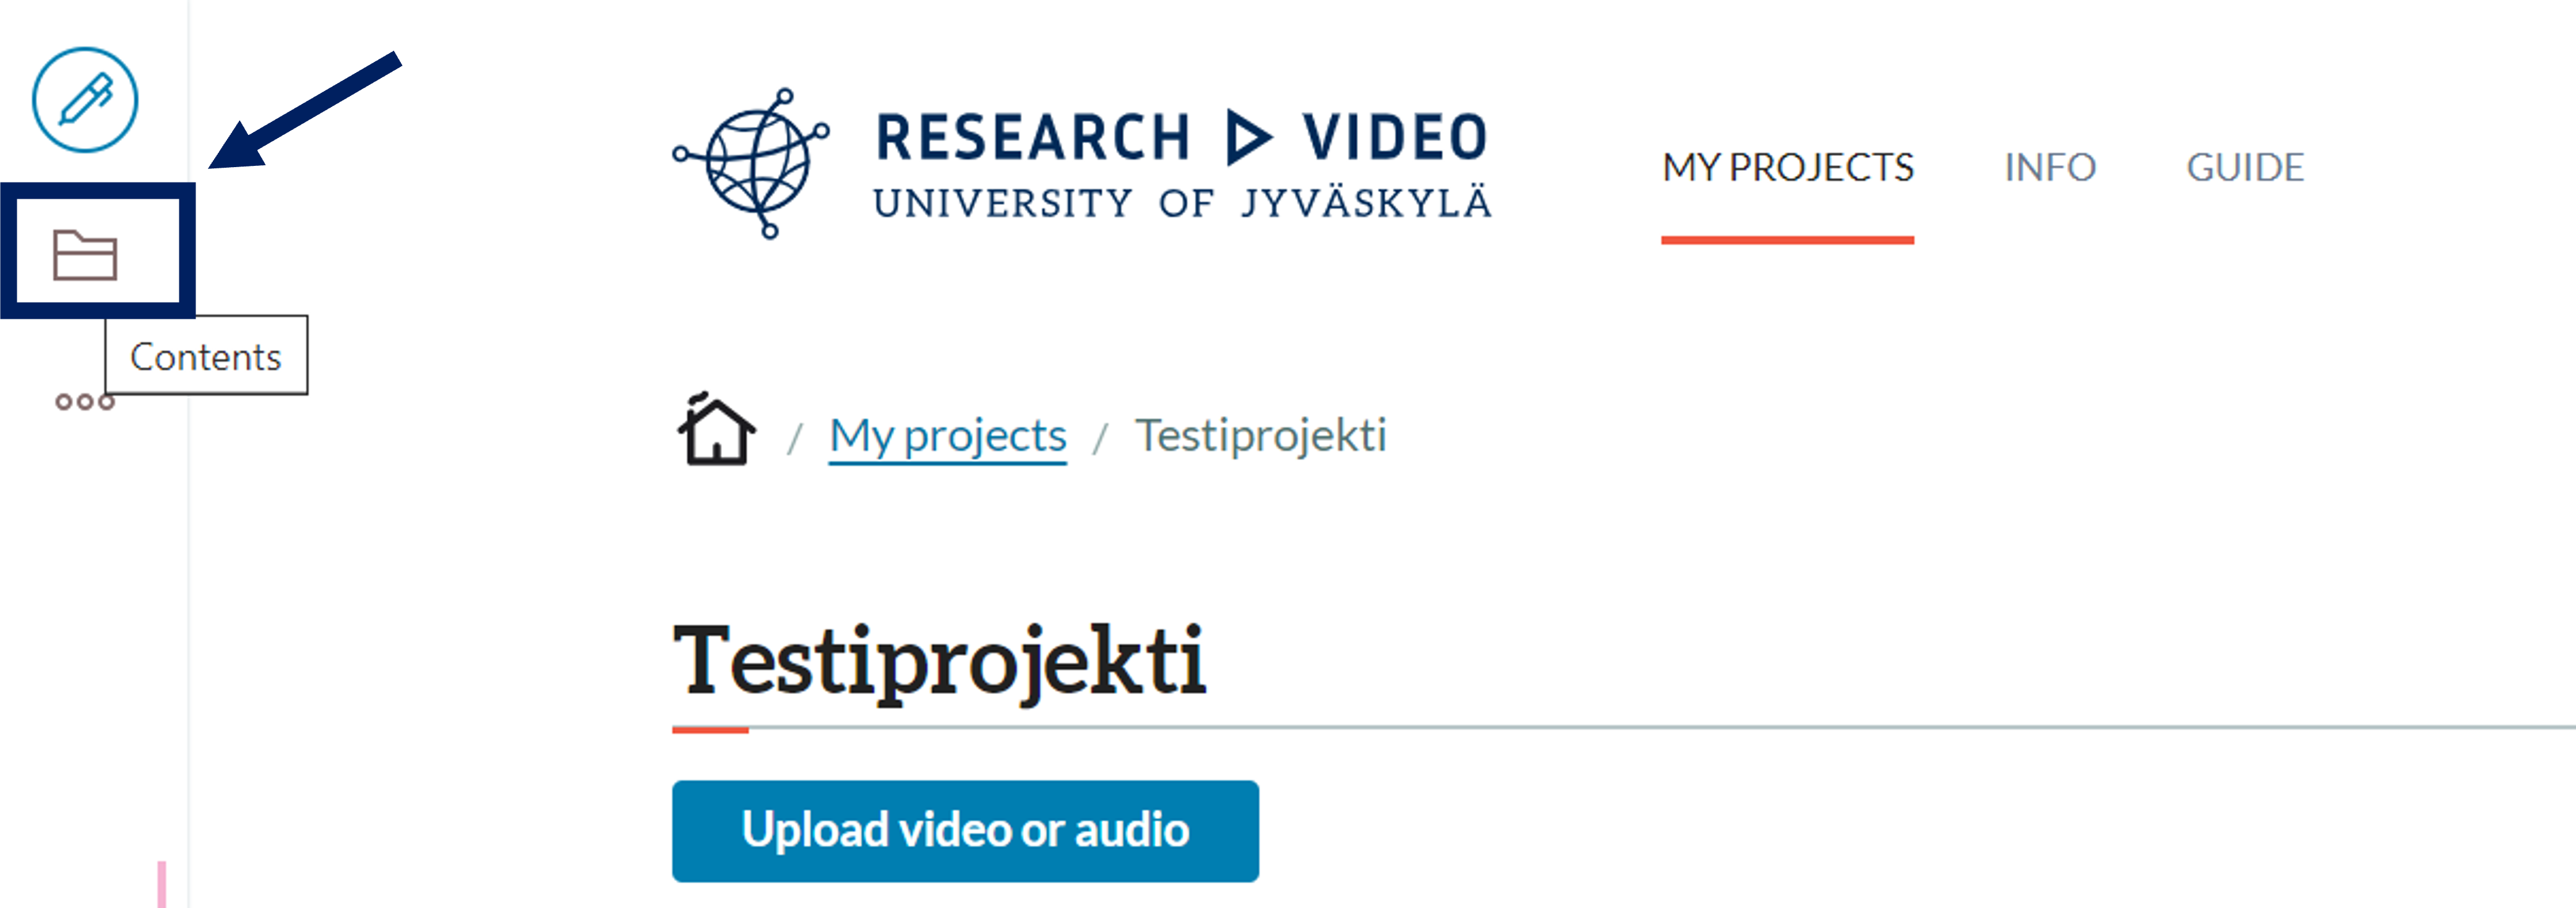
Navigate to the Contents menu on the left side of the Project's page and click the folder icon
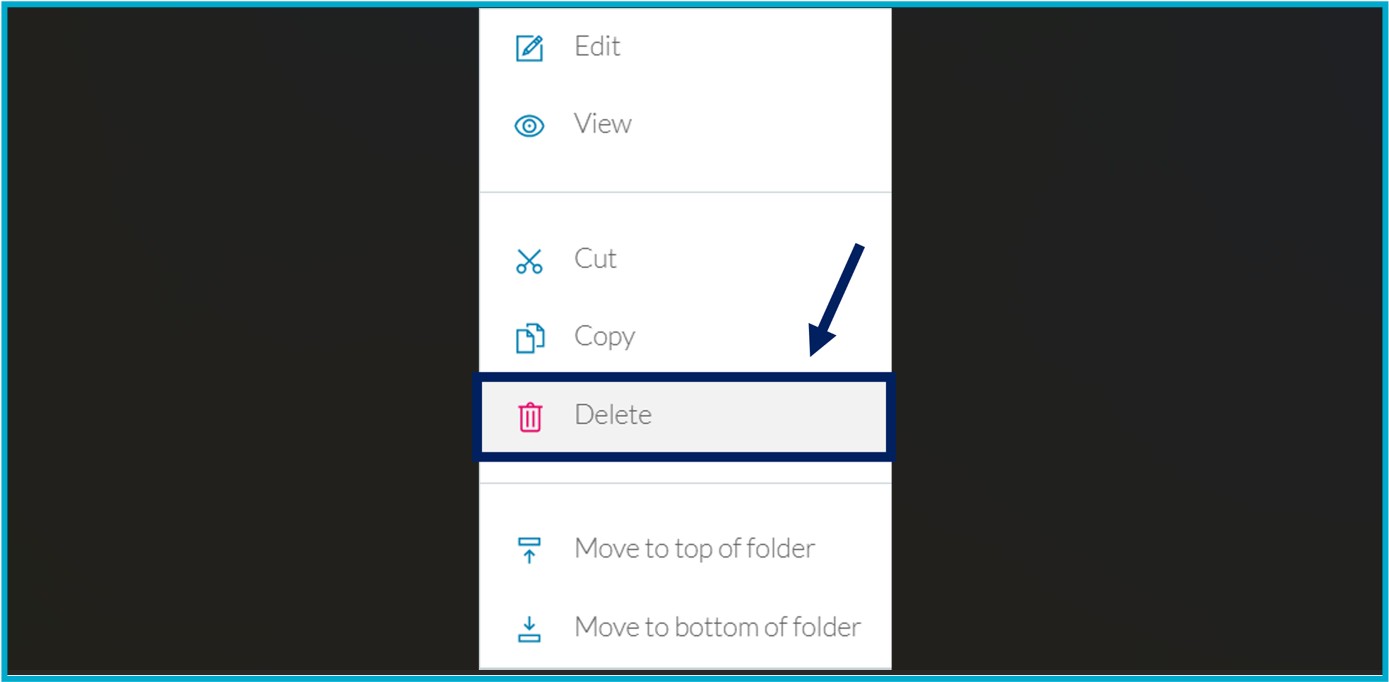
Press the "..." symbol on the right side of the title of the media file you want to remove

Select Delete
J. Categorize your data
Instructions on how to utilize tags in order to better organize your data within your Researchvideo project will be added soon.
Use a logical file naming convention to make it easier to find files, as Researchvideo allows you to filter content by name.
MyJYU AI Transcription
How to use MyJYU AI Transcription - info and instructions.
Quick guide for downloading transcripts of recordings made with MyJYU AI transcription recorder
Before downloading, make sure that your browser settings direct the download to the intended secure storage location (e.g. JYU's NextCloud, network drive or locally on your JYU work computer). If you are downloading sensitive data, the location might need to be encrypted first, and the folder/vault needs to be opened before downloading files out of Researchvideo. Instuctions on how to encrypt folders by using Cryptomator.
- Log in to Researchvideo: https://video.rc.jyu.fi/.
- On the My Media page, click the name of the file whose transcript you want to download.
- A page will open where you can view and play your file. Below the media player on that page, click the Download button.
- In the Download file window that opens, select the transcript language under the Subtitles heading (e.g., Subtitles: Finnish with timestamps or without) and check the box "I have understood the above and agree to handle the data with care."
- Click Download.

Frequently asked questions
Check our FAQ page to see if others have bumped into the same question.
More info: General instructions regarding the use of MyJYU and Researchvideo
If you run into problems when using the service, please contact Researchvideo support via HelpJYU.
Admin instructions
Admins only - Adding projects, users and setting permissions.